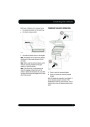


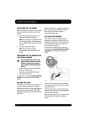


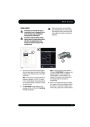


Tyre repair kit
USING THE REPAIR KIT
REPAIR PROCEDURE
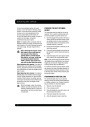
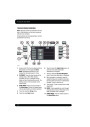
Avoid skin contact with the sealant
which contains natural rubber latex.
Check the tyre sidewall prior to
inflation. If there are any cracks,
bumps or similar damage, do not
attempt to inflate the tyre. Do not
stand directly beside the tyre while
the compressor is pumping. Watch the
tyre sidewall: If any cracks, bumps or
similar damage appear, turn off the
compressor and let the air out by
means of the pressure relief valve. Do
not continue to use the tyre.
Do not unscrew the sealant bottle from
the receiver until it is empty, as
sealant will leak out.
If the tyre inflation pressure does not
reach 1.8 bar (26 lb/in²) within seven
minutes, the tyre may have suffered
excessive damage. A temporary
repair will not be possible, and the
vehicle should not be driven until the
tyre has been replaced.
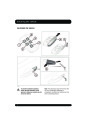
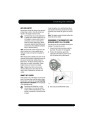
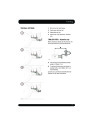
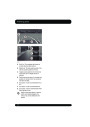
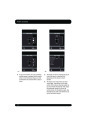
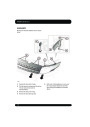
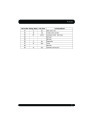
1.
Open the tyre repair kit and peel off the
maximum speed label. Attach the label to
the facia in the driver's field of view. Take
care not to obstruct any of the instruments
or warning lights.
Before attempting a tyre repair, ensure
that the vehicle is parked safely, as far
away from passing traffic as possible.
Ensure that the parking brake is applied,
and P is selected if an automatic
transmission is fitted.
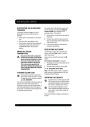
2.
3.
4.
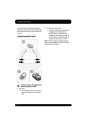
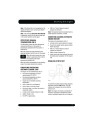
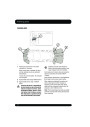
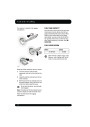
Uncoil the compressor power cable and
the inflation hose.
Unscrew the orange cap from the sealant
bottle receiver, and the sealant bottle cap.
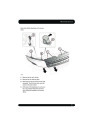
Do not attempt to remove foreign
objects such as nails, screws, etc. from
the tyre.
Screw the sealant bottle into the receiver
(clockwise) until tight.
Always run the engine when using the
compressor, unless the vehicle is in an
enclosed, or poorly ventilated space.
�
Screwing the bottle onto the receiver
will pierce the bottle's seal.
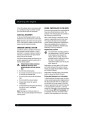
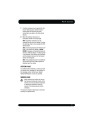
5.
Remove the valve cap from the damaged
tyre.
To prevent overheating do not operate
the compressor continuously for longer
than ten minutes.
6. Remove the protective cap from the
inflation hose, and connect the inflation
hose to the tyre valve. Ensure that the hose
is screwed on firmly.
Note: All vehicle drivers and occupants should
be made aware that a temporary repair has
been made to a tyre fitted to the vehicle. They
should also be made aware of the special
driving conditions imposed when using a
repaired tyre.
7. Ensure that the compressor switch is in the
off (O) position.
8.
Insert the power cable connector into an
auxiliary power socket. See 70,
AUXILIARY POWER SOCKETS.
9.
Unless the vehicle is in an enclosed area,
start the engine.
205
| Categories | Land Rover, Land Rover Evoque |
|---|---|
| Tags | Land Rover |
| Model Year | 2011 |
| Download File |
|
| Language | Bulgarian, English |
| Product Name | Evoque Handbook |
| Product Brand | Land Rover |
| Applicable to Country | Bulgaria, International |
| Document File Type | |
| Publisher | landrover.com |
| Wikipedia's Page | http://en.wikipedia.org/wiki/Land_Rover |
| Copyright | Attribution Non-commercial |
(0 votes, average: 0 out of 5)