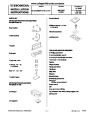


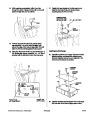
Illustration of the CD Changer Installed on the
Vehicle
•
tapping screws.
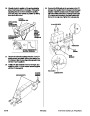
With a front armrest: Remove the four self-
RADIO
CD CHANGER
SELF-TAPPING
SCREWS
PROTECTOR
BUS CABLE
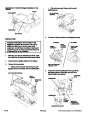
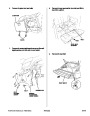
4.
Remove the front console (four self-tapping screws).
INSTALLATION
Customer Information:The information in this
installation instruction is intended for use only by
skilled technicians who have the proper tools,
equipment, and training to correctly and safely add
equipment to your car.These procedures should not
be attempted by“do-it-yourselfers.”
A/T Model
M/T Model
SELF-
TAPPING
SCREWS
FRONT
CONSOLE
Remove the
shift lever
knob.
1.
Make sure you have the anti-theft code for the radio,
thenwritedownthefrequenciesforthepresetbuttons.
2.
3.
Disconnect the negative cable from the battery.
Remove the rear console.
Move the gearshift
selector to “N.”
•
Without a front armrest: Remove the two self-
tapping screws, and release the two retaining tabs.
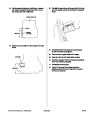
5.
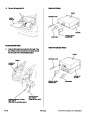
Remove the driver’s dashboard lower cover (three
self-tapping screws, three clips, and pull), then
disconnect the connector(s).
SELF-TAPPING SCREWS
RETAINING
CLIP
REAR
CONSOLE
CONNECTOR
RETAINING
TABS
CONNECTOR
SELF-
TAPPING
SCREW
DRIVER’S
DASHBOARD
LOWER COVER
MOONROOF MODEL
2
of 9
AII20459(9908)
© 1999 American Honda Motor Co., Inc. - All Rights Reserved.
| Categories | Car Audio and Video, Honda Civic Manuals, Honda Manuals |
|---|---|
| Document Type | Free Auto PDF Instruction Manual Download |
| Download File |
|
| Document File Type | |
| Publisher | automobiles.honda.com |
| Wikipedia's Page | Honda Civic |
| Copyright | Attribution Non-commercial |
(0 votes, average: 0 out of 5)