

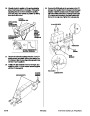
3
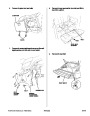
0. Visually check the position of the spring adjusting
pins on both sides of the CD changer.If the spring
adjusting pins are not in the vertical (V) position,
move the pins to the vertical (V) position by sliding
them down with an awl.
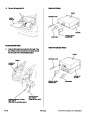
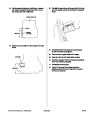
33. Connect the BUS cable to the connector on the CD
changer, then position the CD changer onto the base
bracket. Install the protector onto the base bracket
with holes offset toward the CD changer.Secure the
CD changer and protector to the base bracket with
the four 6 mm cap nuts.Tighten the nuts securely.
SPRING
ADJUSTING PIN
LEFT LOCKING
COVER
(furnished with
CD changer kit)
6
mm CAP NUTS
RIGHT
LOCKING
COVER
(furnished
SPRING ADJUSTING
PIN HORIZONTAL
POSITION
with CD
changer kit)
PROTECTOR
SPRING ADJUSTING PIN
VERTICAL POSITION
CLIP
(Reuse.)
BASE
BRACKET
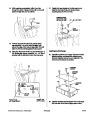
31.
32.
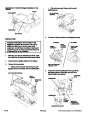
Remove the adhesive backings from the“L”and“R”
locking covers, and attach them to the sides of the
CD changer.Align the two diagonally opposite holes
with the H andV positions.
Position the side brackets on the CD changer, and
install four of the 4 x 6 mm washer-screws supplied
with the CD changer kit.
BUS CABLE
4
x 6 mm
CUSHIONTAPE
WASHER-
SCREWS
SIDE BRACKETS
8
of 9
AII20459(9908)
© 1999 American Honda Motor Co., Inc. - All Rights Reserved.
| Categories | Car Audio and Video, Honda Civic Manuals, Honda Manuals |
|---|---|
| Document Type | Free Auto PDF Instruction Manual Download |
| Download File |
|
| Document File Type | |
| Publisher | automobiles.honda.com |
| Wikipedia's Page | Honda Civic |
| Copyright | Attribution Non-commercial |
(0 votes, average: 0 out of 5)