

24.
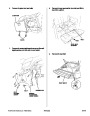
While wearing eye protection, drill a 3 mm hole
through the mark. Enlarge the hole with a 6 mm drill
bit, then finally with an 8 mm drill bit.
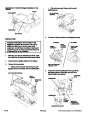
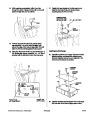
27. Position the base bracket on the floor panel, and
install the two bolts.Torque the bumper beam
mounting bolt to 65 N•m (47 lb-ft).
BUMPER BEAM
MOUNTING BOLT
6
5 N•m (47 lb-ft)
1/4" – 20 x 3/4" BOLT
DRILL
BASE
BRACKET
25.
26.
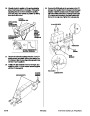
Remove any burrs from the hole, and trim away
approximately 1 mm of the body insulation from
around the edge of the hole you just drilled.This will
allow the Rivnut to lie flat against the floor panel.
Installing the CD Changer
Using the Rivnut toolT/N A911A-365-WXXXX and a
3/4"
provided with the kit into the hole in the floor panel.
combination wrench, install the 1/4" – 20 Rivnut
28.
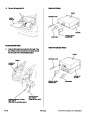
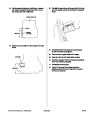
Carefully unpack the CD changer.Remove the three
shipping screws, and discard the shipping cover.
Save the shipping screws for your customer in the
event the unit needs to be serviced.
SHIPPING
SCREW
SHIPPING
COVER
ADHESIVE
SEAL
Hold the
Allen
wrench.
1/4"
– 20
RIVNUT
Tighten with
a 3/4" wrench.
RIVNUT TOOL
A911A-365-WXXXX
29. Install an adhesive seal (included in the CD Changer
Kit) over each of the three shipping screw holes.
©
1999 American Honda Motor Co., Inc. - All Rights Reserved.
AII20459(9908)
7 of 9
| Categories | Car Audio and Video, Honda Civic Manuals, Honda Manuals |
|---|---|
| Document Type | Free Auto PDF Instruction Manual Download |
| Download File |
|
| Document File Type | |
| Publisher | automobiles.honda.com |
| Wikipedia's Page | Honda Civic |
| Copyright | Attribution Non-commercial |
(0 votes, average: 0 out of 5)